Skip to Content
Proud Sponsors of: cfl logo
Air Miles Logo
My Store: Hickey's TIMBER MART (Conception Bay South)
Today's Hours: 8am - 5:30pm
My Store: Hickey's TIMBER MART (Conception Bay South)
fr
In this issue:

DIY textured wood wall

Presented by

Putting wood on the walls isn’t anything new. Most of us remember the wood panelling that was so popular in the ’70s and ’80s, and then there was the pallet wall trend and the shiplap phenomenon. But there’s an even newer way to put wood on your walls, and we think it’s the easiest — and most interesting — technique yet.


We’re loving the trend of a textured “end” wall, made entirely from the cut ends of wood.


Here’s what you’ll need to get started:

First of all, you need to calculate how many 2×6 boards you’ll need.

You’ll be cutting your 2×6 boards into 1” chunks, so an eight-foot board (96”) should give you around 90 1” slices of 2×6 — allowing for a bit of wiggle room. Assume each slice of 2×6 has a total area of about 8.25 inches (keeping in mind that a 2×6 is really more like a 1.5×5.5).


Use this formula: Thickness of board x width of board = area of your slice


Measure the height and width of the area you want to cover with wood. Maybe it’s a half-wall in your entryway, a section of your kitchen, or a nook at the end of your hallway.

Multiply the area’s height and width to determine its total area. If your area is 5’ long (60”) and 3’ tall (36”), that’s an area of 15 square feet (2,160 inches). This is how you’ll know how much plywood is required to cover the area.


Use this formula: Height of area x length of area = total area*

*Remember that one square foot = 144 inches, so multiply your total square footage by 144 to see the total area in inches


But what about how many slices it will take to cover the plywood? That’s a situation where calculating the “area” doesn’t do us any good. Since we’re talking about putting specific shapes on a wall, it makes more sense to think about how many of each shape we can fit in a row.


Use this formula: Length of area ÷ length of slice = slices required per row


If the area you want to cover with wood is 5’ long (60”) and your wood slices are each 5.5” long, you’re going to need 10.9 slices running along each row — so, really, you’ll need 11 with a bit of a trim on the last one.

To determine how many rows you’ll need, you’ll divide the height of the area by the height of each wood slice.


Use this formula: Height of area ÷ height of slice = rows required

If that area you want to cover is 3’ tall (36”) and your wood slices are 1.5” tall (remember that although it’s advertised as a 2×6, it’s not actually two inches thick), you’ll exactly 24 rows of wood slices — no extra cutting required!


So, to recap, you’d need 24 rows of 11 slices (with a few trims depending on your arrangement) for a total of 264 wood slices. Since you’re getting about 90 slices from one eight-foot board, you’ll need exactly three boards.


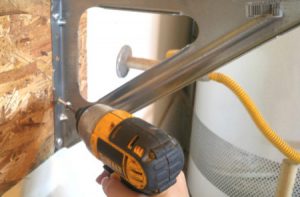
Once you’ve cut all of the slices you need for the area of wall you want to cover, it’s time to get them in place. Grab your tube of LePage PL Premium Fast Grab construction adhesive, because you’re going to give it a real workout.

Apply a bit of the adhesive to the back of each wood slice, and start securing them to your plywood. If you’ve cut slightly different thicknesses, try to arrange them randomly — attempting a pattern will probably drive you crazy!


We love that LePage PL Premium Fast Grab construction adhesive is eight times stronger than ordinary solvent-based construction adhesives during those first critical 24 hours when it’s curing, so you won’t have to worry about chunks of wood falling off your beautiful new wall.

Stain those cool textured “ends” or leave them natural, and secure the plywood to the area with heavy-duty screws and anchors. (You can do this before adding your wood slices, if you’d prefer.)

Then stand back to admire the funky textured wall that looks like a million bucks … when, really, it probably cost you less than $50.


Application Instructions:

Apply adhesive to one surface of the material being bonded. Press the surfaces firmly together within 20 minutes. Materials may be repositioned within 20 minutes after joining the surfaces. If bonding two non-porous surfaces (such as metal and fiberglass) or under very dry conditions (less than 30% relative humidity), add water in the form of a very light or atomized spray from spray mist water bottle to the extruded adhesive. The repositioning time will then be reduced to less than 15 minutes. Use mechanical support for 24 hours while the adhesive cures. Cure time is dependent upon temperature, humidity, porosity of substrate and amount of adhesive used. Low temperature and humidity will slow cure time. When bonding EPS and XPS foam insulation, avoid cure and surface temperatures above 32°C (90°F).

How to Build a DIY Garage Storage Wall System

Presented by

Is your garage workshop starting to feel a little cluttered? Elisha Albretsen from Pneumatic Addict has teamed up with Simpson Strong-Tie to bring you an easy DIY garage storage wall system.


I love my garage. I love having a space where I can get creative and build things. Organizing said garage is a different matter. Until lately, I’ve had virtually no storage space for my tools. Everything was piled up in boxes or on the floor.

I was tired of stumbling every time I reached for a tool, so I finally grabbed some hardware and sketched up a plan for a garage storage wall system.


Materials Used:


This garage storage wall system project is completely modular and adjustable to your needs. The component that makes the flexible design possible is the backerboard. My first step was to attach a 4′ x 8′ x 3/8″ sheet of OSB sheathing to the wall. This backer panel not only works as a base for the storage system, it helps to protect the wall behind it.


I made sure to locate the studs and securely fasten the OSB using #8 x 2 1/2″ wood screws. With the backerboard anchored to the structure of the wall, I could safely configure my storage any way that I like.


Since I build DIY furniture, I have quite a collection of clamps that I need easy access to.


I came up with a super-easy solution. First, I attached a Simpson Strong-Tie® H1 hurricane tie to the OSB backerboard, upside down, using Simpson Strong-Tie SD 8×1.25″ wafer-head screws. Then I cut an 8″ length from a 2×4 stud and slid it into the opening, tight against the OSB. I secured the 2×4 using more SD8x1.25″ screws and I was ready to hang clamps.


To create hooks for some of my hand tools, I attached Simpson Strong-Tie RTU2 connectors to the OSB backerboard, using SD8x1.25″ wafer-head screws.


They hold things like saws and levels perfectly.


I have a healthy collection of chargers for my power tools. Some can be mounted to the wall, but a few need to sit on a flat surface such as a shelf.


I attached three Simpson Strong-Tie® SBV shelving brackets along the bottom edge of the OSB and added a 1×12 bullnose shelf. To hold it in place, I drove #8 x 5/8″ wood screws through the bracket into the underside of the shelf.


The depth of the lower shelf allowed me to add a couple of baskets for items I need to grab quickly like batteries and measuring tapes.


It was so convenient to be able to place my shelves wherever I needed them! If you have larger items to store, you can choose deeper shelves and space them further apart.


The space under the bottom shelf was the perfect spot to drive a few more screws for hanging extension cords and air hoses.


By thinking vertically, I’ve made much more storage space for myself! Each tool has a designated spot, and my garage should be a lot easier to keep tidy, even for the organizationally challenged like me.


Editor’s note: This post is part of an occasional series featuring guest bloggers who are Simpson Strong-Tie brand ambassadors. Today’s post is by Elisha Albretsen from Pneumatic Addict. She is a mom of twin boys and describes herself as an independent former hairstylist who loves to build.


Perfecting your walls

Presented by

Do the walls in your home need a little TLC? We know it’s something that’s been on your mind, as you walk by those dents, dings, and uneven surfaces.

We’re going to show you exactly how easy it is to fix those walls once and for all, and make them look better than ever before …


Patch the holes

We’ve all been there — we get it. You were moving something heavy and someone’s hand slipped, which sent that dresser crashing into the drywall. So annoying, right?If you need to do a small drywall patch job, we recommend a drywall compound that’s easy to handle and easy to sand, like CGC Sheetrock® and Durabond® Brand Setting-Type Patching Compounds. They come in resealable pouches so you don’t have to mix up more than you need for a small job, and you’ll end up with a hard, plaster-like surface when it dries.If you’re only dealing with a small hole — maybe from a relocated receptacle or that time the doorknob accidentally dented the wall by the laundry room — we’re big fans of the CGC Strait-Flex® Perma-Patch. It’ll form a strong bond to the damaged surface and save you a ton of time.


Stabilize weaker outlets

It’s easy to accidentally mis-cut the tight area around a receptacle box, and it’s annoying to see a gap between where the drywall ends and your light switch or electrical socket begins.If you have an area or two, try a CGC Strait-Flex® Outlet Patch. They’re pre-cut to fit around standard electrical receptacle boxes, so you just need to stick them in place to reinforce any mis-cuts or damaged areas. Easy peasy!


Fix any damaged walls

Maybe you’re dealing with a bigger situation, like a wall that was never drywalled properly the first time and needs to be redone? Or a wallpaper-removal situation that went south VERY quickly.To make this job as quick and tidy as possible, we recommend CGC Sheetrock® Brand Dust Control® Drywall Compound. We don’t promise to understand the science behind it, but it was actually designed so the dust falls to the ground instead of floating around the air and making you cough.


Prime it perfect!

We know, we know — priming isn’t nearly as fun or rewarding as painting your walls their final colour. But priming is SO important, especially when you’re taking the time to get smooth, even walls.We’re into products that give us an extra helping hand, so that’s why we like CGC Sheetrock® Brand First Coat™ Drywall Paint. It’s a premium primer with the ability to minimize surface texture variations. Instead of your drywall looking smooth in some areas and lumpy-and-bumpy in others, its special formulation equalizes texture differences and provides a nice even finish coat.


Questions about getting those walls nice and smooth? Don’t be shy about asking — we’re always here to help!