Skip to Content
Proud Sponsors of: cfl logo
Air Miles Logo
My Store: Hickey's TIMBER MART (Conception Bay South)
Today's Hours: 8am - 5pm
My Store: Hickey's TIMBER MART (Conception Bay South)
fr
In this issue:

Five creative tool storage solutions

Presented by

There are so many different ways to organize your tools, but what works for one handyperson won’t necessarily work for another — it all depends on the size and layout of your space.

If your tools could use an organizational upgrade, now’s the perfect time to tweak your systems.

From custom-cut foam to upcycling something that’s in your kitchen right now, here are five creative ways to organize your tools (and keep them that way) …

CHARGING STATIONS

What good is a cordless tool if the batteries are dead every time you go to grab it? We love the functionality of charging stations that make it easy to snap batteries back onto chargers as soon as you’re finished with them. Nothing better than beginning a new project knowing you have a full arsenal of fresh, fully-charged batteries ready for you.
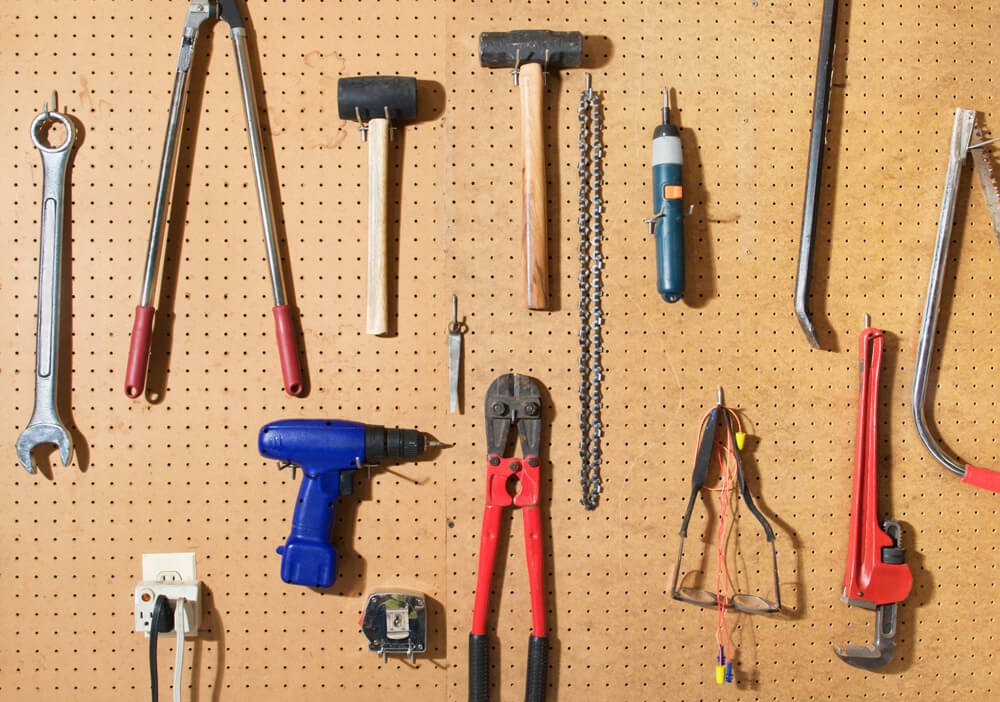
PEGBOARDS

These are a classic, and for good reason! Pegboards are ideal for storing handsaws, screwdrivers, tape, scissors, manual staplers, blades, rulers, tape measures, and other fairly light gear — although, with the proper hooks, they can even provide storage for drills and other heavy tools.

Some folks like to outline the shape of key items so it’s easy where everything goes, while others prefer the freedom to move things around on the board as needed. Looking to try something fancier? Our friends at Makita built an incredible powertool wall out of foam, where each tool has its own custom slot to fit into for safe storage.

DRILL HANGERS

While it’s fine to line your drills up in a row on your workbench, they topple over easily and take up a ton of room. Many savvy builders are creating hanging stations where they can keep their drills up and out of the way. This system is easy to build out of scrap wood, with either cubbies that fit each drill or a rounded cut-out that’s just the right size for it to balance snugly.

TUBE STORAGE

For long, awkward items — like clamps and metresticks — try securing them within PVC pipes screwed into the wall or ceiling. Once they have their own slot, it’s easy to put them away until you need them again.

PVC pipes also come in handy for storing tubes of caulking. You can cut the tubes to form storage cups and screw them into the wall for drop-and-go storage. Or you can buy smaller piping and cut half-moon sections snug enough to clamp onto each tube, holding it in place.

Mason jars

MASON JARS

Start saving empty pasta sauce jars and jam jars, and soon you’ll find yourself with a ton of great (free) storage for nails, screws, nuts, and bolts. Screw the metal lid into the bottom of a shelf or workbench, and then the jar hangs below — displaying the contents through the clear glass.

Inspired to give your tools an organizational overhaul? We’d love to help. Pop into your local TIMBER MART for even more storage solutions.


How to create a quiet podcast studio at home

Presented by

In a perfect world, you’d record your podcast in a dedicated studio where every inch was covered with those expensive grey acoustic tiles, right?

Well, not everyone can make that happen. Sometimes our home podcast studios must play double-duty, also acting as spare bedrooms or family rooms.

Not to worry, because you can still have an at-home podcast studio that also functions as an attractive, normal room in your home. The key lies in being able to record in a quiet, sound-friendly space. Soundproofing means you’re isolating a room from unwanted noise coming from other areas, while sound-treating means you’re improving the quality of sound within the room.

Choose the best possible room in your home.

If you’re planning to record in a room with windows facing a busy street, you might want to rethink that. The ideal home recording studio location is in the quietest spot in your home, far away from loud appliances and banging exterior doors. Small rooms are better than large rooms, too, because you can better control the sound.

Fill the walls with sound-absorbing insulation.

Sound Transmission Class (STC) rates how well a building partition reduces airborne sound, and QuietZone® PINK® Fiberglas® Acoustic Batt Insulation is powerful enough to improve a room’s STC ratings by 4-10 decibels. It’s designed to absorb sound vibrations transmitted through walls, floors, and ceilings.

While this insulation is popular for podcast studios and home offices, it’s also used quite often in home theatres, bedrooms, and even laundry rooms and kitchens (to muffle the noise from noisy appliances, like dishwashers, washers and dryers).

Decorate with all things “soft.”

Hard surfaces like wood, glass, and tile are terrible for audio quality. That’s why so many recording studios have walls covered with textured foam (or egg cartons). Carpets, rugs, and thick curtains can help give you a similar effect at home.

Create a pre-recording checklist.

Even though you want your podcast recording studio to be as quiet as possible, the reality is that you still need to live in (and enjoy) your home. So make a list of how you can improve the sound quality only for your recording sessions – like switching off air conditioners, putting a sign on the door, turning off phone ringers, maybe even turning off your fridge or freezer temporarily. (If you mess with your fridge or freezer, be sure to set a reminder so you don’t leave it off too long and let everything melt and spoil.)

Eager to start working on your new at-home podcast recording studio? We’re happy to share more suggestions. Stop by your local TIMBER MART today.

Meet the new accent wall: brightening a room with a trimmed accent area

Presented by

Remember when everyone was painting accent walls? The new “it” painting trend is to use moulding to create trimmed-out accent areas — perfect for adding a splash of colour in a contained space.

Because you’re working with a smaller area, it’s easier to be brave and choose a really spectacular paint colour. And since you’re working within the confines of a specific area, you don’t have the usual accent wall worries, like how the colour will look when it’s butting up against another wall.

There’s an entire rainbow of possibilities, like Red Gumball (PPG1187-7), Caramelized Orange (PPG1197-7), Rise-N-Shine yellow (PPG1206-7), Royal Hunter Green (PPG1133-7), Bimini Blue (PPG1235-7), Tint of Turquoise (PPG1232-5), Geranium Pink (PPG1182-6), or Imperial Purple (PPG1175-7).

No matter what shade you choose, here’s how to create your own trimmed accent area …

Accent wall example

1. Decide how you’ll use your accent area.

If it’s going to display photo frames or other decorative pieces (like a mirror or painting), you’ll want to take that into consideration when planning the size. Spread out the items on the floor and determine how much “white space” (painted space) should be around them.

2. Tape off the area you want to highlight.

Rectangular accent areas tend to be the most popular, but choose what works best in your space. The beauty of painter’s tape is that you can easily test out a few shapes and sizes to see what you like.

3. Paint the area inside the painter’s tape.

Since your edges will be covered up by moulding, there’s no need to worry about a slight bleed under the tape — totally liberating! Remember that darker colours may require an extra coat or two, and priming first might be helpful, depending on your original wall colour. Remove your painter’s tape while the final coat is still wet.

4. Measure, cut, and paint your moulding.

You’ll want your corners to be mitred (45-degree angles) for the tidiest look, so measure carefully and cut the pieces you need to fit neatly around the painted area. Hold them up to make sure they’re the right size (and connect properly at the corners) and then it’s time to paint them. Much easier to do that now, rather than once they’re installed. Maybe a nice crisp white or warm cream, to contrast against your colourful painted area?

5. Install your moulding and fill any holes.

Depending on the weight of your moulding, a brad-nailer might be the best tool to install the pieces — fully covering the line where old paint meets new. Fill in any holes left behind from the installation, and use a small brush to touch up the paint as needed.

That’s it — you’re done! We hope you love your new accent area, and we’d certainly like to see a picture the next time you visit us in-store.

Have a few questions before getting started? We’re here for you! Stop by your local TIMBER MART to learn more.