Skip to Content
Proud Sponsors of: cfl logo
Air Miles Logo
My Store: Hickey's TIMBER MART (Conception Bay South)
Today's Hours: Closed
My Store: Hickey's TIMBER MART (Conception Bay South)
fr
In this issue:

How to make a dry-erase wall with Krylon

Presented by

Painting chalkboard walls has been popular for years, and not just for playrooms and children’s rooms. Homeowners have fun painting chalkboard walls in their kitchens for scribbling out recipes and grocery lists, and sometimes even create fancy chalkboard walls in their living rooms.

But chalkboard walls aren’t for everyone, and many people quickly tired of the chalky dust that seemed to get everywhere. They also didn’t like being limited to dark green or black walls so the chalk would show up properly.

Luckily, there’s now a way to take the creativity of a chalkboard wall and remove the mess and the design woe of having only two colour choices.

We love the new dry-erase coating from KRYLON spray paint. It comes in a fast-drying, easy to use aerosol can which provides a smooth, glossy finish to any surface.

Here’s the best part: KRYLON Dry Erase spray paint comes in both white and clear which means you can apply it over any paint colour. Yes, it’s true. A pale pink dry-erase board? Cheerful yellow? Cool blue? It’s up to you! (Oh, and it can go over any brand of paint, too.)

Once the dry-erase coating has cured for seven days, you can use it just like any other whiteboard with standard whiteboard markers. The wall will wipe perfectly clean, without any of the “ghosting” you sometimes see on old whiteboards. You know, those faded meeting notes from years past.

Ready for a little inspiration? Here are a few ways we’d love to see you incorporate KRYLON’s new Dry Erase spray paint in your home …


KIDS ROOMS

Imagine handing your kids a package of colourful dry-erase markers and telling them they can draw all over an entire wall! Think about the fun they would have with their friend


HOME OFFICE ORGANIZATION

Think about how much cooler it would be to jot your to-do list on the wall instead of on a piece of paper. You could even paint a simple time management grid with four quadrants so you could fill it out Stephen Covey-style.


PLAYROOMS

Pair the dry-erase coating with a magnetic paint, and you’ve got a multifunctional playroom wall. Craft little magnet characters or vehicles with your kids, and show them how to draw a world of roads and houses for their new toys to explore.


KITCHENS

Have a dedicated area for jotting down a grocery list without worrying about airborne chalk dust floating into everyone’s lunches. You could also write down recipe steps so you can reference them while cooking without touching your phone with gooey fingers.


MUDROOMS

How about a whiteboard wall above your kids’ backpacks and shoes, where everyone in the family can reference a huge calendar? Keep markers handy for writing down dentist appointments, team practices, lessons, birthday parties and who’s supposed to be where at what time.


WE’RE EXCITED TO SEE WHAT YOU DO WITH THE NEW KRYLON DRY ERASE SPRAY PAINT. BE SURE TO SHOW US AN “AFTER” PHOTO THE NEXT TIME YOU’RE IN THE STORE!

How to Build your own Lawn Chair

MATERIALS LIST:

17 linear feet of 2 x 4 pine
30 linear feet of 1 x 4 pine
95 – 2 1/2″ wood screws
4 – 3 1/2″ carriage bolts
4 – 3 1/2″ lag screws
Glue

LUMBER REQUIRED:

6 pieces of 2″ x 4″ – 8 foot length
3 pieces of 1″ x 6″ – 8 foot length

TOOLS NEEDED:

Circular Saw or Handsaw
Hammer
Drill
Bar clamps
Screwdriver
Straight Edge
Tape Measure


STEP 1 – BUILDING THE SEAT

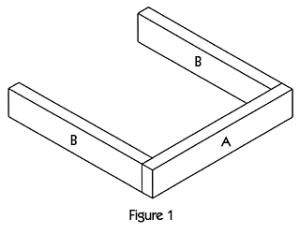
Cut one Seat Front (A) from 1 x 4 pine x 20″ long. Cut two Seat Sides (B) from 2 x 4 pine x 19″ long. Position the two Seat Sides (B) on edge, parallel to each other and 17″ apart. Fit the Seat Front (A) over the end of the Seat Sides (B), as shown in figure 1.

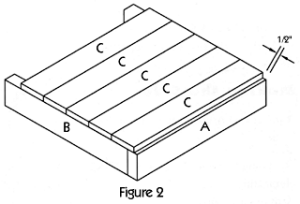
Apply glue to the meeting surfaces, and screw through the Seat Front (A) into the ends of Seat Sides (B), using two 2 1/2″ wood screws on each joint. Cut five Seat Slats (C) from 1 x 4 pine x 20″. Place the seat assembly -Seat Front (A) and Seat Sides (B)  on a flat surface. Position the five Seat Slats (C) over the assembly, as shown in figure 2. The first Seat Slats (C) should be set back 1/2″ inch from the face of the Seat Front (A), and the Seat Sides (B), using two 2 c1/2″ wood screws on each joint.


STEP 2 – BUILDING THE BACK

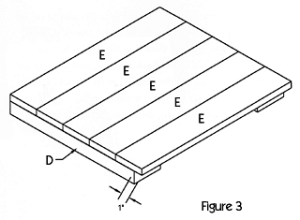
Cut two Back Supports (D) from 2 x 4 pine x 14 1/2″ long. Cut five Backs (E) from 1 x 4 pine x 20″ long. Position the two Back Supports (D) on a flat surface, parallel to each other and 13″ apart. Position one Back (E) over the two Back Supports (D), as shown in figure 3. The first Back (E) should overhang the ends of the two Back Supports (D) by 1″ on each side.

Apply glue to the meeting surfaces, and screw through the Back (E) into each of the Back Supports (D), using two 2 1/2″ wood screws on each joint. Position remaining 4 Backs (E) to the two Back Supports (D).


STEP 3 – BUILDING THE SIDES

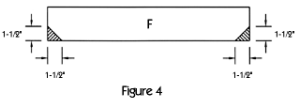
Cut two Arms (F) from 1 x 4 pine x 21″ long. Using figure 4 as a guide, shape the one Arm (F) by cutting off the shaded portions. Use the shaped Arm (F) as a pattern to cut the remaining Arm (F). Cut four Arm Supports (G) from two 2 x 4 pine x 24″ long.

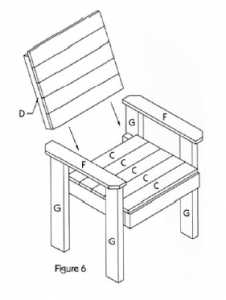
Position two Arm Supports (G) on a level surface, parallel to each other and 12″ apart. Place one Arm (F), uncut edge down, over the ends of the two Arm Supports (G), as shown in figure 6. The Arm (F) should overlap each of the Arm Supports (G) by 1″ on each side. Apply glue to the meeting surfaces, and screw through the B Arm (F) into each of the Arm Supports (G), using two 2 1/2″ wood screws on each joint. Place remaining 2 Arm Supports (G) to remaining Arm (F) to complete other side.


STEP 4 – ATTACHING THE ARMS

Draw a line across the inside of each Arm Support (G) 18″ from the unattached end. This will be the placement line. The object is to clamp the assembled seat between the two side assemblies (as shown in figure 6), then secure the seat with carriage bolts.

The top of the seat should be positioned at the placement lines you drew on the Arm Supports (G). The front Arm Support (G) should be positioned 2″ from the front of the seat assembly. When the sides are in position, clamp the two sides and seat assemblies tightly together, using bar clamps.

Drill a hole slightly larger than the diameter of the 3 1/2″ carriage bolts through the center of each of the Arm Supports (G) and the Seat Sides (B). Then insert a 3 1/2″ carriage bolt through each of the holes. Tighten the bolts securely.


STEP 5 – ADDING THE BACK

Insert the back assembly between the two assembled sides. The Backs (E) should face the front of the chair, and the recessed end of the two Back Supports (D) should be at the top of the chair. To make the chair more comfortable, tilt the back assembly at a slight angle, out at the top and at the bottom. The tilt angle is determined by the width of the 2 x 4 on the Arm Supports (G) and the back of the Arm (F).

When the back is fitted perfectly, secure the assembly with bar clamps. Screw through the Arm Supports (G) into the Back Supports (D) using two 2 1/2″ wood screws. Then insert a 3 1/2″ lag screw through the Arm Supports (G) and into the Back Supports (D).


STEP 6 – FINISHING

Fill any cracks, crevices or screw holes with wood filler. Sand the completed chair thoroughly. Paint or stain the chair the color of your choice or simply leave it natural.

Be sure to practice workshop safety at all times.


How to Install Drywall with CGC

Presented by

Watch CGC’s video on how to install your own drywall. These simple steps make installation easy! For further tips and advice, stop by your local TIMBER MART to keep your project running smoothly.