


Why paint your walls a single colour when you can have fun creating a unique pattern that shows off your personality? It’s easier than you think!
Here are three fun ways to add a splash of colour and pattern to a room in your home…
1. Polka dot walls:
Dots are a timeless pattern that can really change a room’s decor. You can make them any size – or even a variety of sizes all mixed together and stick to a single colour or go wild with different shades.
Start by painting your base coat and remember that ideally your dots will be a darker shade. (It’s much easier to paint over something with a deeper colour, unless you don’t mind doing a lot of coats.) Let the walls dry for at least four hours or overnight.
If you have a steady hand, you can use a drafting compass and a pencil to lightly draw the circles right on the wall. Then you can use a small craft brush to carefully fill them in with your darker colours. You can also trace your circles onto stencil sheets (or bristol-board or cardstock) and cut them out, so you essentially have big pieces of paper with holes in them.
Once you’ve figured out where you want your circles to be on the wall, use low-tack/safe-release tape to secure your stencil to the wall. Dip your stencil brush into a VERY small amount of paint – wipe most of it off – and make a swirling motion starting from the outer edge of the circle, working towards the center. This way you’re less likely to have paint seep under your stencil and ruin your circle’s nice edge.
Fill in all of your circles this way and you may need to touch them up with a second coat. Often a stencil isn’t required for that step and you can simply use a small paint brush to carefully fill in any light areas.
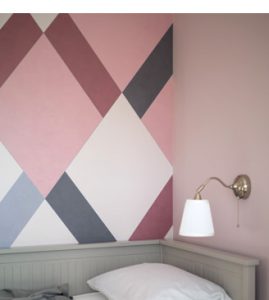
2. Diamond (Harlequin) walls:
Give a room the royal treatment with a dramatic diamond pattern. Start by choosing two coordinating paint shades – a base coat and a darker coat to put on top. Paint the walls your base colour and let it dry for at least four hours.
It’s time to make your grid! This is how you’ll make a series of diamonds that are all identical, without the frustration of tracing a cardboard diamond shape and trying to line it up as you move across the room.
Using a large ruler, a level, and a pencil (or chalk), carefully draw a grid of vertical rectangles – meaning they’re about twice as tall as they are wide. Once you’re finished with the grid, you’ll make a light pencil mark in the centre of each rectangle side – top, bottom, left and right.
Here’s where you can start to see the wall take shape. Use your ruler to draw a straight line between the top mark and the left mark, then the left to the bottom, then the bottom to the right, and finally the right to top again – making a diamond within your rectangle. Do this for each rectangle and you’ll have a wall full of rows of diamonds – with diamonds also in the spaces between.
Tape off one set of diamonds (i.e. the ones you drew, not the ones left in the spaces) and fill them in with a small paint roller. Remove the tape while the paint is still tacky, and do any touch-ups required.
3. Custom graphic walls:
You can’t always find adhesive wall decals or wallpapers that go with a particular theme, so why not paint your own? No artistic talent necessary, we promise.
Once your walls are painted your base colour – and dried for at least four hours – project an image onto the wall and turn out the lights so you can see it clearly. It could be a character from your child’s favourite TV show, a quote from a beloved book, or an entire magical scene.
Using a pencil, lightly trace the image(s) onto the wall until the full design is transferred and you can turn off the projector. Turn the lights back on and fill in your design with as many paint colours as you’d like. Be sure to let each area dry before you paint next to it so the colours don’t smudge.
…
Enjoy your painting adventure and be sure to ask us if you have any questions!